Monday, April 28, 2014
Pop Up
Working On Pop Up book! One page to go yay! It may not look like it but this sh*t takes Hours to make *-* cutting tiny pieces and compose every part of the images.... glue/cut/paln.... I'd say it take about 5-7 hours for one page *-*. ( that's not counting the screen printing of the graphic used for this, it's just the cut/plan/glue). Once the last one it done i'll have to start worrying about the binding *-* but that's for later!
Monday, April 21, 2014
Last "working" news
I don't know when the last news came... Anyway!
I've been working on engraving/etching/screen printing for nearly two years now. As every artistic activities there is shiny happy times full of ideas and sadly there is also harder times when inspiration takes a few days, weeks, months where everything you do seems pretty grey... I've been fighting a Big grey monster for a wile now but fortunately there is still few brighter day popping once in a while with ideas and enthusiasm! Today is on of those; it's sunny, warm, I have flowers on my desk and I finally found an idea that I like for a project . So i thought I'd share some of it with you!
This is lino cut. I use dark pen to outline the engraving so I know where I'm going. It should be ready to be printed tomorrow so stay around as I'll post the printed version soon enough!
Stay tuned!
Friday, April 18, 2014
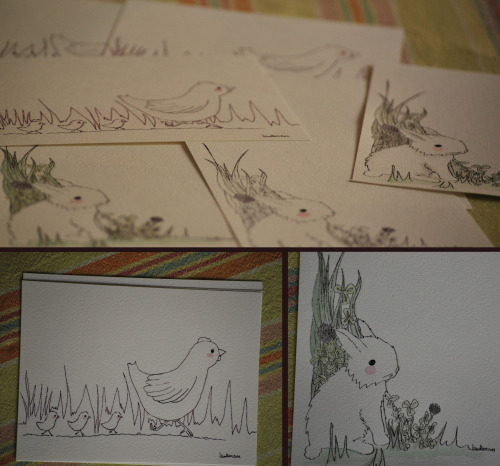
Easter Cards
I’ve been ask to make Easter cards this year.
It's not that easy to get Easter card which are not too cliche r_r…
But I’m pretty happy with the result. I tried to make something simple and elegant. It's far from
my usual colorfull Christmas cards but I really like to try something else. I always had the feeling
that Easter should have the soft light spring feeling and I pretty proud of them plus they look super cute IMO!:p! ( especially when I think that I had 1 day to come up with something!)
They are Black And white cards on which I add a bit of watercolor by hands. I hope you like them!
Happy Easter!
Thursday, April 17, 2014
Royal Kiwi cake.
Kiwi Royal cake.
Sometime I Like to invent new recipe for my bake to answer a specific envy. Changing detail of cookie recipe to make them more chewy, or make a cake lighter... Some time I also just improvise with "what have to get rid of quickly" . I happen to had Kiwi and plain Yogurt so I improvised a cake.
For the Royal kiwi cake you will need:
- 125 gr melted butter
-3 eggs
-150gr of sugar
-100gr plain Yogurt
-1 t.s. Baking powder
- 200gr all purpose flour.
For the cream:
-100 ml of cream
-50 gr of yogurt
-50gr powdered sugar
A) Beat eggs white's till they stiff, keep for later.
In a Bowl Mix the yolk, the yogurt and the sugar. When well mixed stir the flour and the backing powder slowly , finally add the melted butter and the stiffed white eggs.
B) turn the oven to T7, and prepare your cake mold(s) ( paper or oil as you prefer) You can either use one big mold and cut the cake or use two tiny ones. ( I prefer two tiny one, it's way easier to get the perfect cooking from tiny cakes). once the oven is hot put the cake in and lower the temperature ( T5-6) let it cook for 15-20 min, the cakes have to be golden and smoth.
C) After cooking take the cake out of their molds and let them cool on a grid ( cover them with a towel). While cakes are cooling, slice the kiwis and prepare the "cream". For the cream you just have to mix the cream, the yogurt and the sugar. Put some cream and kiwi slice on the top of the first cake, then cover it with the second cake and coat the whole thing in cream. Finish your decoration with kiwi slices.

Bon appétit!
Subscribe to:
Posts (Atom)


